How to Disable Autocorrect on Google Android Keyboard?

The ‘autocorrect’ feature has its uses. It is great for predicting what you would want to say next and also correcting typing errors when you are in a hurry or are distracted and miss them. At the same times though, the feature can easily become annoying when you are trying to type in slang maybe with your friends, or trying to type in another language. Then it becomes tiring going back to rewrite everything you’ve written because the autocorrect feature keeps changing it.

If this feature is more of a bother to you than it is helping you, you will be glad to know that you can easily disable it and have your keyboard reflect exactly what you’ve written and only that. To do thus, all you need to do s follow these steps:

Also Read : How to copy Unselectable text on Mobile App

Step 1 :- Launch the Google Keyboard (Gboard)

How to Disable Autocorrect on Google Android Keyboard?

Tap on a text field, like you are about to type something, for the keyboard to show up. As an alternative, you can use the app shortcut to open it.

Step 2 :- Open settings

Then, long press on the emoji icon and select the gear icon from above it. The gear icon is the Settings for the keyboard. You can also go to Settings > System > Languages & Input > Virtual Keyboard > Gboard. If you are using the app shortcut, the settings page would be on the main screen.

Step 3 :- Select text correction

How to Disable Autocorrect on Google Android 10 Keyboard

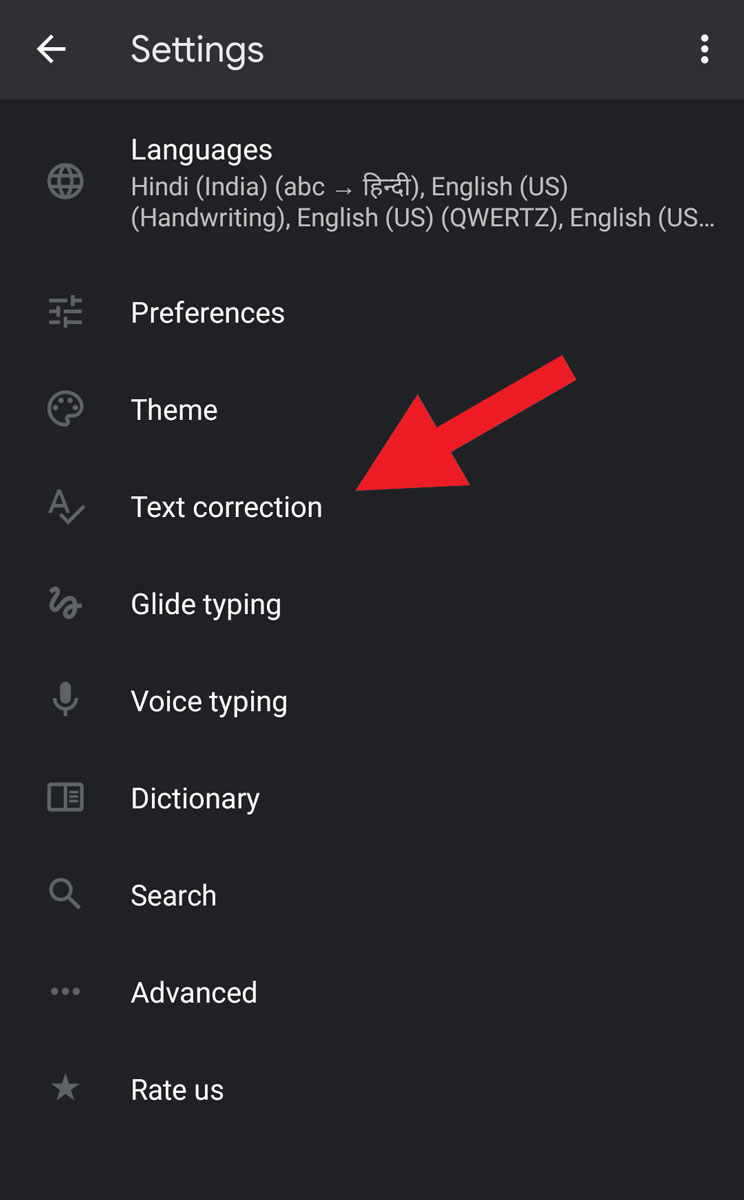
Scroll down the available options in the Settings menu and click on text correction.

Step 4 :- Scroll to the ‘Correction’ Header

How to turn off auto correct on GBoard

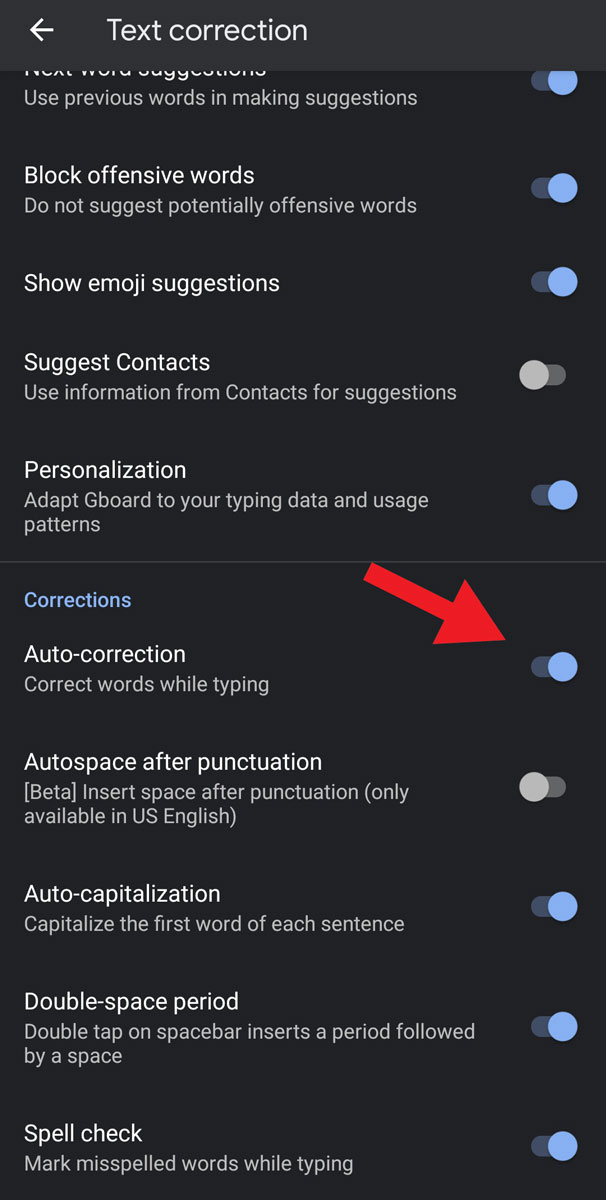
Turn off the auto-correction option by toggling off the blue switch beside it. When you do this, the blue button becomes grey and this means that the auto-correction feature has been turned off.
To be sure, launch the Google Keyboard again by tapping on a text field then try sending a message. There will be no predictions and the text you write won’t be automatically corrected anymore. Note that this isn’t a permanent thing though. Should you wish it, you can always turn the auto-correct feature back on. All you’d need to do is follow the above steps and then toggle on the switch. The grey button will become blue and this means that it has been reversed and the feature is on again.

Also Read:- How to Completely delete Gmail Account [Full Guide]

How to Completely Delete Google Account

Sometimes, some drastic measures have to be taken and one of those measures is deleting your Google account. For whatever reason, you may have decided to delete your Google account and in this article, we will be showing you exactly how to do that. It is important that you remember that this action is permanent. You will lose all the data and content in that account, you won’t be able to sign in to use Google services with that account once it has been deleted, the information you’ve saved on Chrome will be deleted and of course, you’ll lose your Gmail account too.

Now that you understand what exactly deleting your account entails, it’s time to get into it.

Also Read:- How to Delete VLC Player History on Windows, Android and Mac Platform.

How to delete Google account

Step 1: Review and download your info

  • You’d want to review the information you have on your account and then decide on the ones you’d want to keep or download.
  • Once you’ve done that, log into your Google account and click the drop down next to your picture icon.
  • Select Account Settings and back up your data. This will involve downloading and saving the bulk of your data.
  • As an alternative, you can select the ‘Data Liberation’ option on the left side of the screen as it pops up.
  • Update your accounts with a new email address and then update your account recovery information just in case you would want to recover your account later.

Step 2: Delete your account

  • After that is done, it is time to get down to the actual deletion of your account.
  • Go to your Google account.
  • On the left navigation panel, click on the Data and Personalisation. how to delete google account
  • On the place where you see Download, delete or make a plan for your data panel, click on the option that says Delete a service or your account.how to delete google account
  • Then click on the Delete your Google account option.

Also Read:- Best Flagship Smartphone with Latest Snapdragon Soc

Google will then ask you to confirm that you understand the services you are losing access to. You’d need to input your password after and then a final confirmation and pay any pending fees you may still have on your Google account. Tick all the boxes if you are sure you don’t want anything left on your account and then finalise it. It’s done then as you see a confirmation screen telling you that your account has truly been deleted.

Remember again that once your account is gone, that’s it. So before you follow through on these steps, be sure that it is what you truly want. You should also note that if you have multiple Google accounts, deleting one Google account won’t affect the other accounts so you don’t have to worry about that too.

What Should I do if the Phone Falls Into the Water? How to Fixing

This shouldn’t come as news to you but water and smartphones don’t go well together. Despite that, there are a thousand ways your phone can come in contact with water and it goes without saying that the results thereafter, are not very thrilling. When your phone comes in contact with water, the first urge is to freak out. Some people start rubbing it or blowing at it in an attempt to get rid of the water, others get their hands on a blow dryer and attempt to use it as a fan to dry the water.

While these are all well-meaning actions, none of them are the right approach and in many cases, they don’t succeed in doing the job of getting your phone water free. Instead of all of that, here are some steps to follow if your phone falls into water:

Get it out

The first thing to do when your phone falls into water is to get it out immediately. The longer you leave it in, the greater the chances that water gets into the phone and causes serious damage. If you can immediately remove your phone after it has fallen into water, there is a chance you can save it will be fine.

Turn it off

If your phone is still turned on after you’ve removed it from the water source, the next thing to do is to turn it off as quickly as possible. This will prevent a short circuit from occurring and running the mainboard. Note that you shouldn’t reboot the phone. If it is already off when you get it out, leave it off.

Dry it

The next thing to do is to dry it. If it has a removable battery, take it out together with your memory card and SIM card. This helps to stop energy supply to the phone and prevent further damage. You can use a micro fibre towel to quickly wipe it down or shake it while holding it firmly to get rid of the water. Please, do not put your phone in the freezer, oven or use a blow drier to try to dry it as these methods can cause more damage to your phone.

Dry it further

Your phone may be dry on the outside but still have water on the inside, in places that you can’t see. To fix this, loosely wrap your phone in a paper towel and bury it in a bowl of uncooked rice. The rice works by absorbing the moisture trapped in the phone so that it is completely dry both inside and out. As an alternative, you can use silica packets. As silica is a desiccant, it sucks up moisture in the phone.

Turn on phone

Now, you can try to turn on your phone. If it comes on, check to see that everything is functioning normally and there are no glitches. If it doesn’t come on, you may be out of luck and will need to get a new one.

Other Useful Resources

Conclusion

After reading this post, we hope you will be able to start your handset again after falling into the water. If you have any doubt then give your comment below.